Accounts Payable - Reverse Cheques
When the user makes a payment on an Invoice through the AP Select and/or Pay Invoices routine, a Cheque is automatically created for that payment; the Cheques displayed in this routine are those created for Invoice payment. The Accounts Payable Reverse Cheques routine allows the user to reverse such Cheques. To view all Cheques eligible for reversal, the user can simply select the order in which the Cheques are to be displayed (i.e. Sort By) and then execute their query. The query results will be displayed in the AP Cheques section of the screen. From these results, the user must select which Cheques are to be reversed.
When the AP Reverse Cheques routine is accessed from the eQuinox main menu, the screen shown below will be displayed.
Field Definition

The first two fields on this screen display the Journal Type (APCX) and the Journal Number (923).
Date - The date on which the Cheques are being reversed. This field automatically defaults to the current system date.
Acct Period - The Month (in number format) and Year of the Firm's current Accounting Period. This field automatically defaults to the current Accounting Period. Note: Depending on the Firm's preferences (as indicated in the Firm Parameters routine), the user may be alerted with a message when posting the Cheque Reversals, and asked to verify the Accounting Period; this is used to ensure that all transactions occur within the correct Accounting Period.

Bank - The number and name of the General Ledger Bank Account that the Cheque will be drawn from when it is processed (i.e. the account that will be be debited). To view Cheques for a specific account, the user must make a selection from the List of Values provided.
Sort By - The user must select the order in which the records are to be displayed before they execute their query. If the user does not make a selection, the records will be displayed in order of Cheque ID.
After selecting the Bank and sort order, the user must execute their query. The query results will be displayed in the screen sections seen below. From the records displayed, the user must then select those Cheques that are to be reversed.
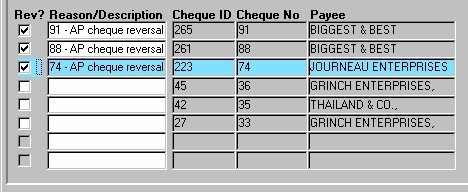
Rev? - If the current Cheque is to be reversed, the user must 'check' this field. The reversal will not be complete until the user has clicked the Save button on the menu bar and the information has been updated to the GL.
Reason/Description - The reason for or description of the Cheque reversal. When the user 'checks' the Rev? check box, this field automatically displays the cheque number and "AP Cheque Reversal" as the description. This may be changed by manually entering a different reason or description.
Cheque ID - The unique identifier automatically assigned to the Cheque when it is created. This is not to be confused with the Cheque Number; the Cheque ID tracks the transaction, while the Cheque Number is the number that appears on the Cheque itself.
Cheque No - When the Cheque is created, the next available Cheque Number is assigned to the Cheque. This is the number that will appear on the Cheque itself when it is printed. For Manual Cheque, the Cheque Number must be entered by the user. Note: The Cheque ID tracks the transaction, while the Cheque Number is the number that appears on the Cheque itself.
Payee - The person or company the Cheque is made payable to (i.e. the Vendor's name, as indicated when the Invoice was entered into the system).

Tran Date - The date of the cheque transaction (i.e. the date of the cheque).
Amount - The dollar amount of the Cheque. This figure is taken from the payment amount, as entered when selecting an Invoice for payment in the Select Invoices for Payment routine.
Description - A description of the Invoice associated with the current Cheque. The description displayed here is as entered when the Invoice was first entered into the system, or as entered when selecting the Invoice for payment ( i.e. by default, this reads "AP Cheque - Name of Payee").
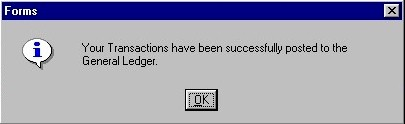
Once the user has selected all Cheques that are to be reversed, they must click the Save button. When the reversal is complete, the user will be notified with the message seen on the left.